
The Problem
The TP-Link Archer C7 V2.0 router I own is a couple of years old by today’s standards. But it’s working perfectly fine. After using it for an year or so, I thought, “How do I customize and enhance it’s features without doing hardware modifications?”. I did a little bit of research and figured, there are plenty of open source firmware options I could choose from. I settled with OpenWRT. The new firmware opened up a new world of possibilities. Everything was rainbows and sunshines!
Lately, I was in the process of upgrading my home network and thought, “Why not update the router’s firmware version as well!?!?”. It’s been a while, it’s likely that there is an updated version. Thanks to the open source community, they are pretty active. I looked up the forums, and sure enough there is an updated version available, V5.0. Mine was V2.0 at the time. The V5.0 seems better! Can’t go wrong, right?
Without much thought, I downloaded the V5.0 and began the flashing process. Little did I know, the V5.0 is for the latest router that is part of the same Archer C7 lineup. The Archer C7 V5.0 and the Archer C7 V2.0 are not the same routers. They are different products, under the same lineup. As I realized it, I’m sure something is going to go wrong. I was doing this all while the flashing process was going on in the background. I gave the flashing process the wrong .bin file as you figured, and sure enough, after a couple of minutes I was stuck in a boot-loop. The progress bar on the flash page never finished. I bricked my router! 😢
WARNING - The router flash page did warn me with a RED sign saying the firmware I supplied doesn’t match with the headers of the existing firmware. I was ignorant, and proceeded anyway. I assumed it is a common “user beware” warning. I was wrong! 😟
Two Seconds Of Silence
I bricked my router! How do I make it work again? I can’t connect to the internet, and I work from home to pay my bills. And today is Friday evening, I have two more days to fix the issue before my work day begins. Can’t think at the moment. I had to go for a walk!
Need to figure out a solution. Buying a new router is not part of it. I feel obligated to fix the issue I put myself into. So, the search begins! Internet, here I come!
Search The Internet For The Right Solution
I looked up countless forum posts and a lot of articles written by experts. Some suggestions took me little closer to the solution, and few made no difference. For some, I had to pull up a linux bootable flash drive to follow along the steps. It took me one and half days to figure out the solution and bring my router back to life! I thought, man, if this is what I had to go through to find the solution, why not write a post and share my findings so that someone else don’t have to go through it again. Sharing is caring, right? Sure!
Preliminary Steps To Make Sure You Are Ready For The De-Bricking Process
- Confirm that your router is indeed bricked!
- One way to check this step is by turning on your router (no LAN connections needed), and observing the lights on the front panel. The lights blink in a random pattern that repeat every ~ 4-5 seconds. This process is called boot-loop. The router is trying to boot into the firmware and couldn’t find it, and is looping over and over again. Poor thing! There is a way to tell the root issue just by looking at the sequence of the blinks and decoding it. Kind of like a morse code, you know! But, I’m not familiar with the process. Let’s leave that to the pros for now.
- We are going to follow the
TFTP Recovery Processto de-brick our router.- Process is pretty straight forward if you follow along. It is even implemented by the OEM guys to flash things into routers. Which means, we got plenty of support for this process on the community forums.
- Let’s go ahead and download the necessary softwares (Windows PC). Just download one of the below softwares and install.
- Download
TFTPD64software from the internet. It’s open source. See the references for the download links. - Alternate Software -
SolarWinds TFTP Server. You can install the trial version and it works!
- Download
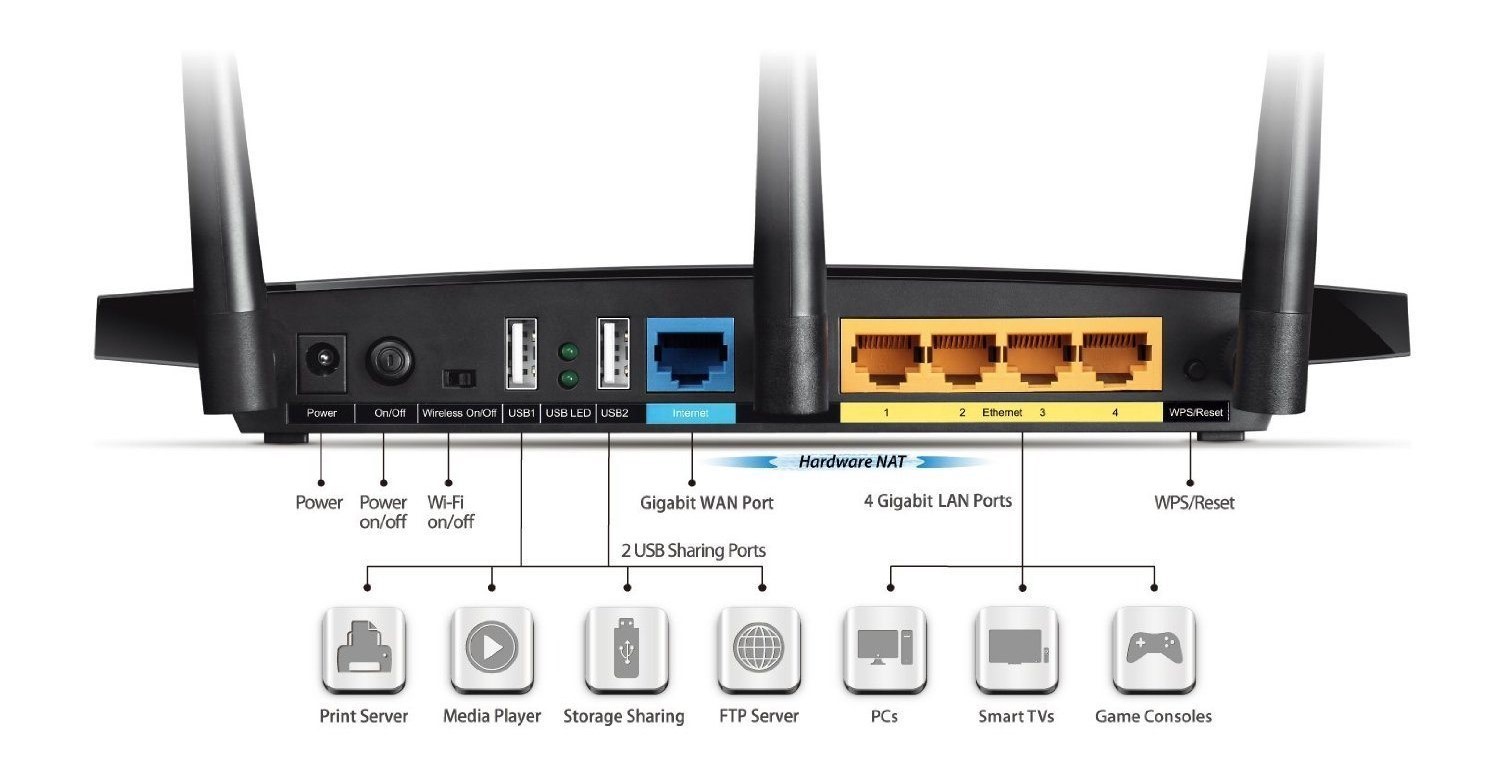
- Connect your router to the laptop/ machine using a RJ45 cable(Ethernet Cable). Plug one end of the the cable into the yellow port(1) on the router, and the other side to the LAN port of the laptop/ machine.
- Download a valid version of the
.bin(the firmware) that you want to flash to the bricked router. I have tried plenty of.binfiles that were available on the forums, and also few from the OpenWRT official download pages. None of them worked! The one and only one that finally worked for me is, a custom version (modified HEX values) of an existing V2.0 firmware from the OpenWRT downloads page. You can get it from here. Download the .zip file and look for the file namedopenwrt-19.07.0-ar71xx-generic-archer-c7-v2-il-squashfs-factory.bin. This is the one you want! It worked for me! I would like to thankdanielschmalhoferfor creating this file and sharing it with everyone. - Alternatively, you can also download the official
TP-Link factory OEM firmwarefrom theTP-Linkwebpage. I didn’t try this step as it would take my router back to the OEM firmware. I didn’t wanted to go back to the OEM firmware. If you choose to go this route, you can download the file from here. If the links are broken, you may want to just look for theTP-Link OEM Factory Firmware Archer C7 2.0on the internet. I’m pretty sure the first one you see would be the official link. Once you have downloaded the file, the rest of the steps remain same. - Whichever the firmware (.bin) file you downloaded (openwrt, or OEM, or some other firmware such as DD-WRT or Tomato etc.), you want to rename the file to
ArcherC7v2_tp_recovery.bin, and place it in the dirs as shown below. FYI, these are the default dirs for the respective softwares, and might be different on your machine.- For
TFTPD64 software- It would beC:\Program Files\Tftpd64 - For
SolarWinds Software- It would beC:\TFTP-Root
- For
OPTIONAL- Download and installWireSharkSoftware to analyze the network traffic during the TFTP File Transfer process.OPTIONAL- After you have downloaded all the necessary files rom the internet, please turn off the internet supply to the machine/ laptop. This step helps reduce the network activity, and helps us focus on the TFTP packets on the WireShark. We don’t need internet from here on.
The De-Bricking/ Un-Bricking Steps
Let’s get on to the actual process. We got a world to concur!
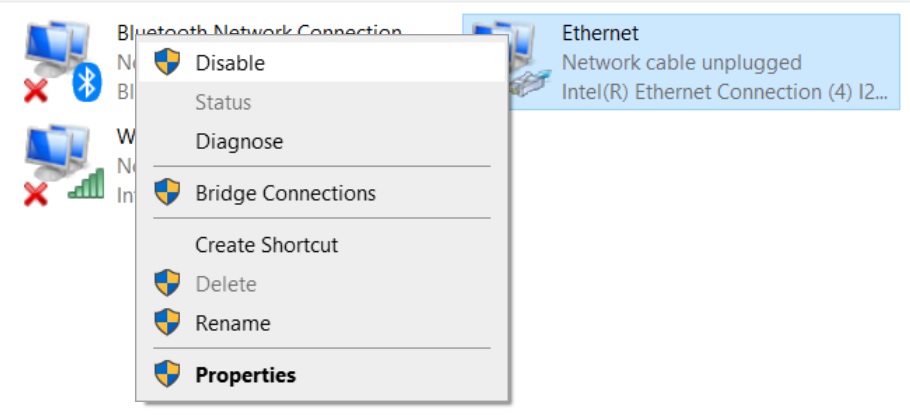
OPTIONAL- Disable all the network adapters (LAN and WLAN) except the one we’ll be working with.- On Windows, hit
Win Key+Rand type this command -ncpa.cpl. This will take us to theNetwork Control Panel. Right click on each of the available icons (adapters) and selectDisable. Do this only if you have more than one LAN (RJ45) Ethernet ports connected to your machine (laptop). If you have just one, you can leave it alone. You do not have to disable the wireless and bluetooth adapters.
- On Windows, hit
- Setting up TFTP Server IP Address in the network control panel
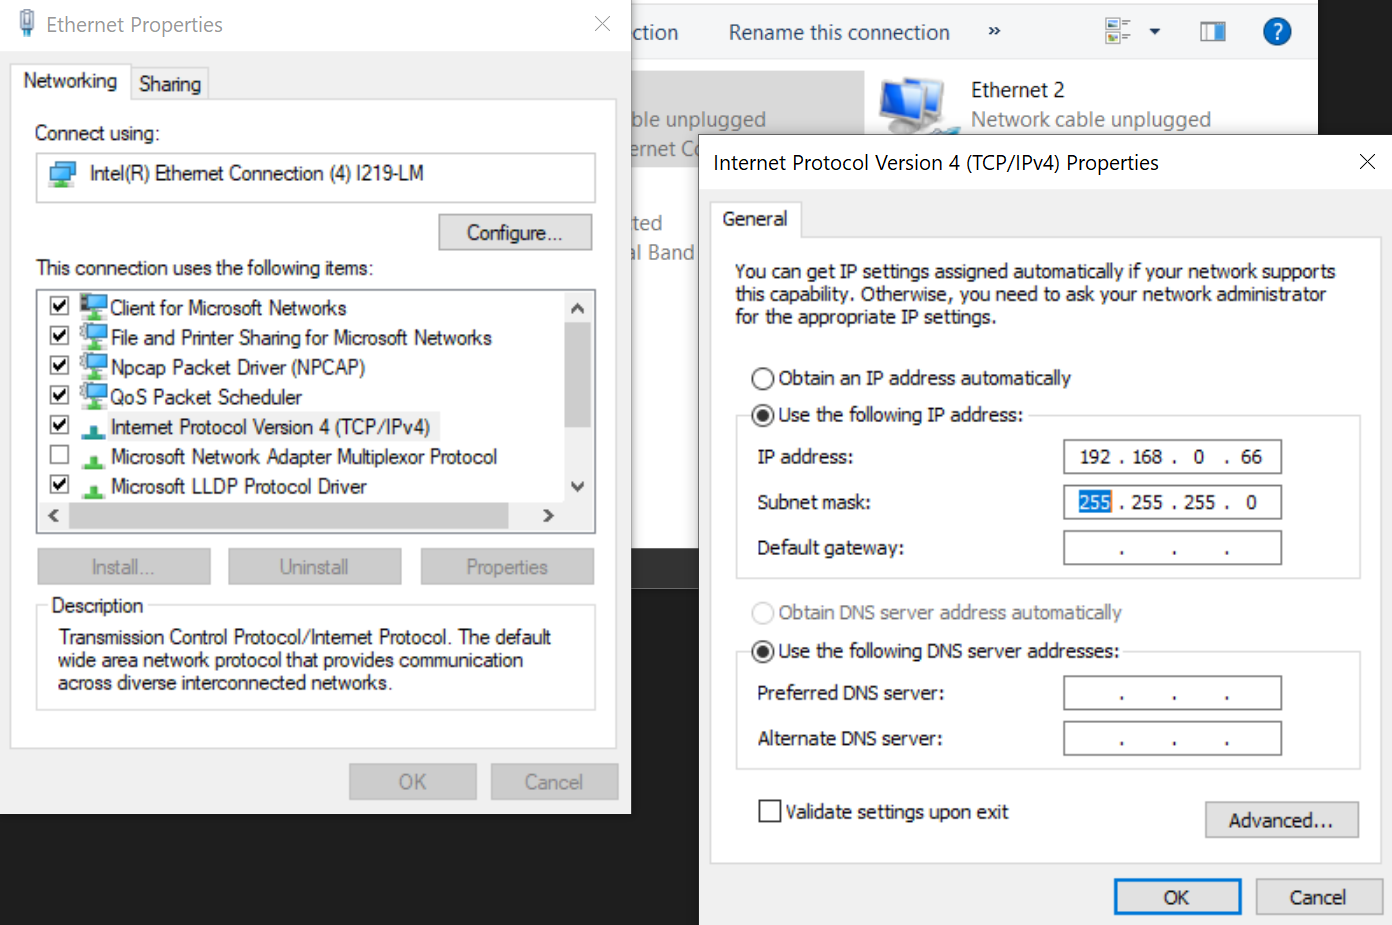
- Right click on the active network adapter (the one we left out in the above step), and select properties (Ethernet Properties). Scroll down to the
Internet protocol version 4 (TCP/ IPV4)and clickpropertiesthat is available next to it. On this window we provide the TFTP server’s IP address and it’s subnet mask to setup our server. The IP address you want is192.168.0.66. Put in the numbers under the ip address section and when you hit tab, the subnet mask should auto-populate. If it doesn’t, you can manually input it as so255.255.255.0. ClickOKtwice, make sure the changes are saved, and exit out of it.
- Right click on the active network adapter (the one we left out in the above step), and select properties (Ethernet Properties). Scroll down to the
- Setting up your laptop/ machine as a TFTP Server
- Whichever the
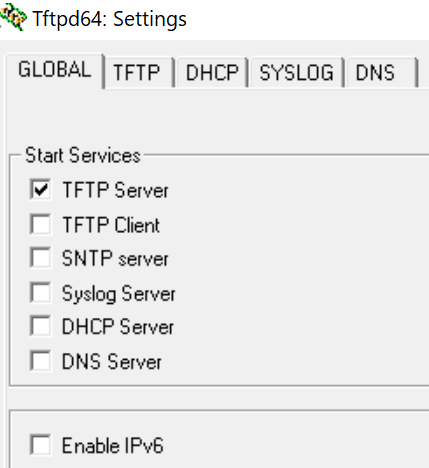
TFTPsoftware you have chosen from thepreliminary steps, pull it up and start it. - If you have chosen
TFTPD64, you have to do the below changes in the settings before you can start using it. The first one is on theTFTPtab and the second is on theGLOBALtab.
- Whichever the
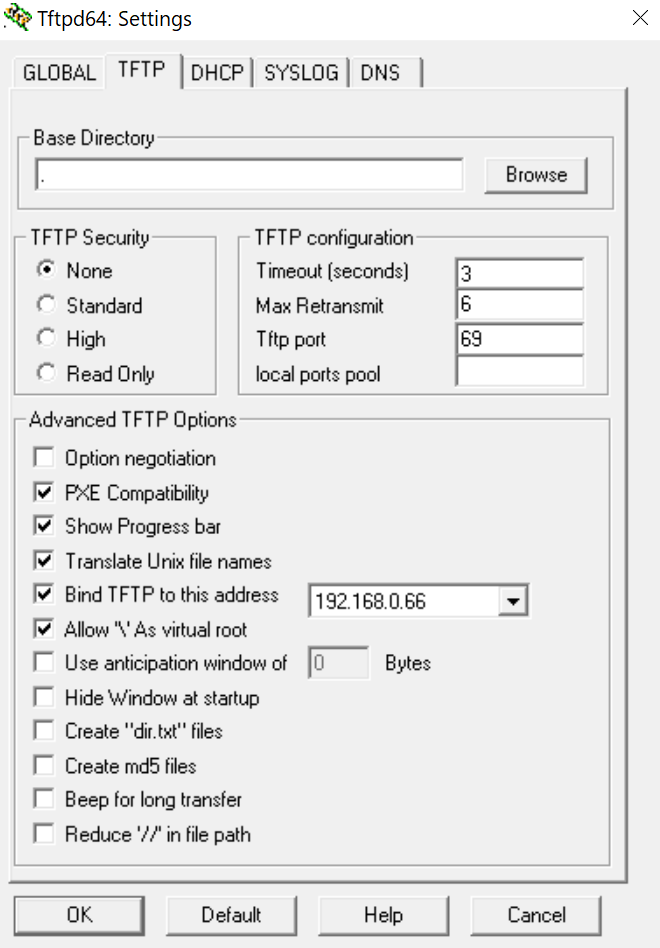
-
For
SolarWindssoftware, no changes are needed. As soon as you open it up, the software will start listening on the TFTP port for all the incoming requests. -
Setting up Router in TFTP client mode
- Follow below steps to start the router in the
TFTP Clientmode. The idea is that, the router should connect to theTFTP serverwe just setup in the previous step as aTFTP Client. Once connected, it helps us read the router’s activity as a log on the server, and figure out what the router is looking for. - Keep the router plugged into the power socket. Keep the power button on the router in
OFFstate. OPTIONAL- Pull up theWireSharkwe installed in the earlier step and read the network packets. You see several read IO between the TFTP Server (laptop/ machine) and the TFTP Client (router).- Press the
Resetbutton (see the router’s back panel image above.. the extreme right label) that’s on the backside of the router, and keep it pressed while you turn the powerONon the router. - DO NOT RELEASE THE RESET BUTTON YET! HOLD THE DOOR! 🚪
- Hold the
Resetbutton (for about 4-5 seconds) until you see a read signal on theTFTP server(Your TFTP server software that we setup earlier). Here you can see what the router is looking for. Ideally it’ll be looking for a file that it could use to flash the firmware. In our case, it’d beArcherC7v2_tp_recovery.bin. - Once the file is picked up by the router. You are good to go.
- You can release the RESET button after the file has been uploaded to the router.
- After this step. DO NOT TOUCH THE ROUTER. Let it do it’s thing! Whatever the thing may be. Leave it alone for few minutes. Take a quick coffee break.
- Follow below steps to start the router in the
-
If everything goes well, you’ll see below items. ✔️
- File was successfully picked up by the router and is under process.
- Router’s
resetlight (on the front panel.. with refresh/ recycle symbol on it.. kind of looks like two arrows going back to back) stays onsolid(no flickering). ThePower(extreme left) and theCPUlight (star) next to it keeps flashing. None of the other lights turn on. This is the sign! This tells us that the router is processing our file. - The flashing process takes about ~ 1-2 minutes, and not more than that. Assuming we are processing a successful file. Fingers crossed.
- The router auto-reboots after the flashing is done.
- At this point we are pretty close to the finish line.
- Now, you should be able to connect to the router using below options.
- Any TTY tool, such as PuTTY using ssh commands.
- Ex: Open up a session on PuTTY to access IP Address
192.168.1.1or192.168.0.1with ssh port 23. - On Windows, alternatively, you can pull up
PowerShelland run this command -ssh [email protected]. If this doesn’t work, try the other IP Address. - There is no password and you should be able to login.
- You can also use
WinSCPto login asrootwith ip address as mentioned above and browse the contents of the router.
- If you were able to do the above step, it confirms that you successfully un-bricked/ de-bricked your router. Congratulations! 👏 ☀️
-
If it didn’t go well. ❌
CASE #1- You will see theresetlight doing a random flash, and the rest of the lights also blink in a repeated cycle. Kind of like a boot-loop like we discussed earlier.CASE #2- TheLANport light, thepowerand theCPUlights stays on in a solid mode, and doesn’t blink. Theresetlight doesn’t blink either, nor turn’s on. This tells us that the router picked up the file, but failed flashing it half way through, or something like that. Either way, it died again. No success!- Whatever the case may be, if it didn’t go well, chances are the file (.bin) we supplied was faulty, or was rejected by the router. This happens if the
headerof the firmware that’s sitting on the router does’t match with the file’s header that we supplied through theTFTP server. - There is a way that you could create your own .bin file from the factory OEM file, stripping away the header. Follow below commands, if you’d choose to do so. I’m assuming you downloaded the OEM file using the links in the references.
- Replace the file names accordingly.
dd if="downloaded_firmware.bin" of="stripped_firmware.bin" skip=257 bs=512- Compare the MD5 checksums after the stripping. It should be
398e1fcdd72baedd475c4048b1f359c0 - If it matches, then you got the file! Now supply this file to the router through the TFTP process we discussed above and get the router back to life. You got it! 👍
-
What To Do If It Doesn’t Go Well ⏳
- Look for valid/ alternate firmware (.bin) that you could flash.
- Make sure the TFTP Server is properly sending the file to the router. Consider using WireShark for the network data analysis.
- Make sure you didn’t break the boot-loader.
- Hardware: You need to open the chassis of the router for this step. You can buy a serial kit that you could solder to a specific set of pins to read the trace during the flash process. Honestly, we don’t know what is going on inside the router after the flash file was picked up. We are hoping for the best! However, to understand the internal processing of the router, the best way is by connecting the serial cables. You can reach more about it here.